
A professional channel letter sign does not end when manufacturing is finished.
Even well-made letters can look uneven, create a weak halo or develop wiring and waterproofing problems if the installation method is not planned correctly.
That is why channel letter installation should be considered before production—not after the sign arrives on site.
The correct installation method depends on:
- Wall material
- Letter size and weight
- Front-lit or backlit construction
- Individual or raceway mounting
- Cable routing
- Power-supply location
- Indoor or outdoor environment
- Local sign and electrical requirements
At HLW Sign, we manufacture custom channel letters for international projects and can provide mounting templates, installation accessories and wiring references for local installers.
This guide explains the most important points to consider when installing channel letters.
1. Check the Wall Before Production
The wall determines how the letters can be fixed, how cables can be hidden and whether extra structural support is needed.
Common installation surfaces include:
- Concrete
- Brick
- Stone
- Aluminum composite panel
- Metal cladding
- Wood
- Drywall
- Glass
Concrete and brick can provide strong mounting surfaces, but the correct anchors depend on the actual substrate and sign load.
For ACP storefronts, the visible panel itself may not be sufficient for large letters. Mounting points may need to connect to steel or aluminum framing behind the panel.
Stone and decorative façades may require additional planning to avoid surface damage.
Glass storefronts normally need a different support solution such as an interior frame, backing panel or suspended system.
Before production, send the sign manufacturer clear photos of the installation wall and surrounding structure.
2. Individual Mount vs Raceway Mount
One of the most important decisions in channel letter installation is whether to mount each letter individually or use a raceway.
Individual Mount
Each letter is installed separately on the wall, usually with concealed studs and wiring.
Advantages include:
- Cleaner appearance
- No visible raceway
- Better floating-letter effect
- Excellent for premium storefronts
- Suitable for halo-lit letters
Individual channel letter mounting is commonly used for hotels, restaurants, salons, corporate offices and premium retail.
The disadvantage is that installation requires more accurate positioning and more planning for cable locations.
Raceway Mount
A raceway is a metal enclosure that carries multiple letters and electrical components.
It can be useful when:
- Behind-wall wiring is difficult
- The façade should have fewer penetrations
- Installation needs to be faster
- The wall is uneven
- Power supplies need easier access
The main disadvantage is appearance because the raceway remains visible unless it is painted to match the building.
3. Use a 1:1 Installation Template
For international projects, a full-size installation template is one of the most useful tools a manufacturer can provide.
A channel letter installation template can show:
- Letter positions
- Logo positions
- Mounting holes
- Cable exits
- Letter spacing
- Overall alignment
Without a template, installers may need to calculate every position manually.
For a long storefront sign, even small positioning errors can become obvious from a distance.
A typical installation process is:
- Position and level the template.
- Mark mounting and cable locations.
- Prepare the wall.
- Install each letter.
- Complete wiring and final alignment.
At HLW Sign, a 1:1 installation template can be prepared according to the approved production artwork.
4. Front-Lit and Backlit Letters Need Different Mounting
Not all illuminated letters should be installed in the same way.
Front-Lit Channel Letters
Front-lit letters direct LED light through the acrylic face.
They can often be installed:
- Directly on the wall
- On studs
- On a raceway
- On a metal frame
- On an ACP backing panel
The main priorities are alignment, wiring and structural support.
Backlit Channel Letters
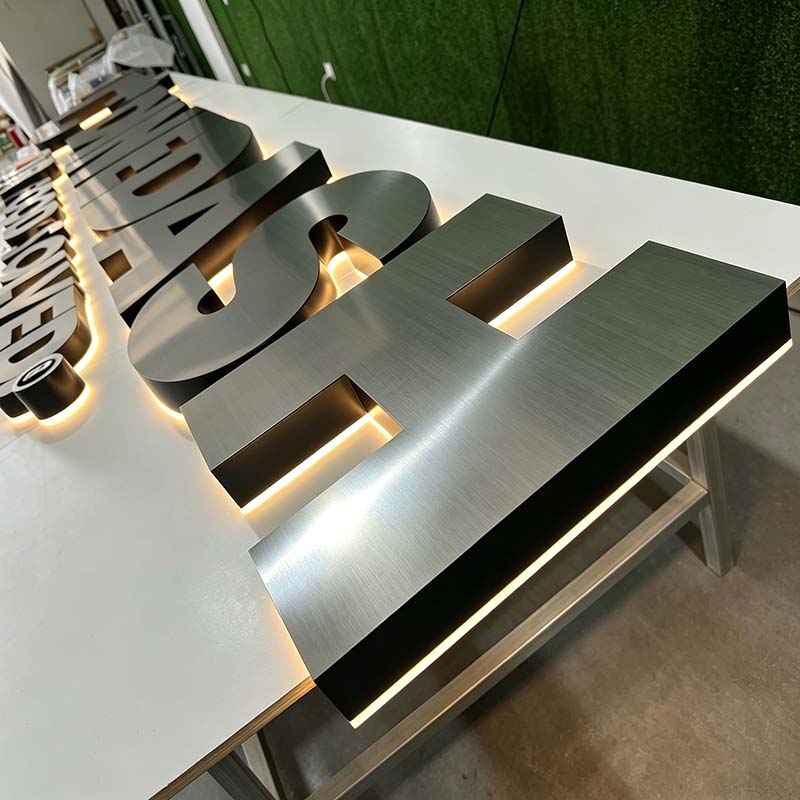
Backlit letters direct light toward the wall to create a halo.
They therefore need space between the letter and the wall.
For many projects, approximately 15–40 mm can work well, but there is no universal distance.
The final halo depends on:
- Letter height
- LED brightness
- Wall color
- Wall texture
- Return depth
- Viewing distance
A smooth, light-colored wall usually reflects halo light better than dark stone or a rough surface.
If the letters sit too close to the wall, the halo may look narrow or uneven. If they sit too far away, the light can become weak and unfocused.
This is why channel letter mounting is part of the lighting design.
For more detail, see our guide to Backlit Channel Letters.
5. Plan Cable Routing Before Manufacturing
Visible wiring is one of the easiest installation problems to prevent.
Before production, confirm:
- Where power is available
- Where cables can pass through the façade
- Whether cables must remain hidden
- Where the power supplies will be installed
- Whether the wall can be penetrated
This is particularly important for individually mounted backlit letters.
A premium brushed stainless-steel sign can lose much of its visual quality if black cables remain visible between the letters.
Whenever possible, provide:
- Front-facing wall photo
- Wider building photo
- Approximate power location
- Wall construction information
- Desired cable route
This allows the manufacturer to plan cable exits before fabrication.
6. Keep Power Supplies Accessible
Power supplies may eventually need inspection or replacement.
Depending on the project, they may be installed:
- Behind an accessible wall
- Inside a raceway
- Inside an electrical enclosure
- Above an accessible ceiling
- Inside a service area
They should not be permanently hidden inside a sealed wall.
For U.S. projects, electrical requirements should also be reviewed before production.
The International Sign Association explains that electric signs in the U.S. involve two important areas:
- UL 48 for electric sign design and fabrication
- NEC Article 600 for sign installation and wiring
International Sign Association – National Electrical Code
For international buyers importing signs into the U.S., local electrical requirements should be confirmed before the sign is manufactured.
7. Understand UL 48 for U.S. Electric Signs
UL Solutions identifies UL 48 as an important standard for electric signs and also references:
- UL 879 — Electric Sign Components
- UL 879A — LED Sign and Sign Retrofit Kits
- NEC / NFPA 70 Article 600
UL’s electric-sign certification program includes custom products such as channel letters.
UL Solutions – Electric Sign Certification
The practical point for buyers is simple:
Electrical requirements should be confirmed before production, not after the sign arrives.
If UL listing, particular components or inspection documents are required, tell the manufacturer during the quotation stage.
8. Outdoor Installation Needs Waterproofing and Drainage
Outdoor signs are exposed to more than direct rain.
Moisture can enter through:
- Cable holes
- Mounting penetrations
- Poorly sealed joints
- Condensation
- Wind-driven rain
A good outdoor channel letter installation should consider both waterproofing and drainage.
Buyers should confirm:
- Indoor or outdoor use
- Local rainfall conditions
- Coastal or inland location
- LED waterproof rating
- Power-supply protection
- Cable-entry sealing
- Drainage design
- Hardware material
This is especially important in coastal, tropical, high-humidity and freeze-thaw environments.
For coastal projects, more corrosion-resistant metal and hardware may also be required.
See our guide to Stainless Steel vs Aluminum Channel Letters for more information.
9. Keep Halo Letter Spacing Consistent
Uniform stand-off spacing is important when installing channel letters with halo illumination.
If one letter is 20 mm from the wall and another is 35 mm away, the halos can look noticeably different.
Installers should make sure:
- Spacers are consistent
- Letters remain parallel to the wall
- Mounting studs do not pull the letters unevenly
- Cable tension does not change the position
Very uneven stone or corrugated surfaces can make direct halo mounting difficult.
In some cases, a flat backing panel creates a better lighting result.
10. Check Local Sign Permits Before Installation
Many cities and communities require permits for new commercial signs.
The International Sign Association notes that local approval may involve sign code compliance and design requirements.
International Sign Association – Permitting Resources
Requirements can involve:
- Sign dimensions
- Projection from the building
- Illumination
- Brightness
- Sign location
- Electrical work
- Historic districts
- Landlord requirements
Rules vary by city and country.
The manufacturer can help provide drawings, dimensions, material specifications and electrical information, but local approval remains project-specific.
11. Large Signs Need Structural Planning
A small reception logo and a 1-meter-high exterior sign are very different installation projects.
Large signs may require consideration of:
- Wind load
- Letter weight
- Wall structure
- Steel frames
- Building penetrations
- Lifting equipment
- Installation height
Large rooftop or high-rise signs should be reviewed by qualified local installers or engineers.
Material selection can also affect installation.
For example, aluminum may be preferred over stainless steel for some large letters because its lower weight simplifies handling and reduces façade load.
12. Inspect the Sign Before Completing Installation
Once the letters are mounted and connected, check the sign during both daytime and nighttime.
Inspect:
Alignment
Are all letters straight and evenly spaced?
Illumination
Is brightness consistent?
Halo
For backlit letters, is the halo even?
Color Temperature
Do all letters have the same white tone?
Wiring
Are cables concealed as planned?
Surface Condition
Were acrylic or metal surfaces scratched during installation?
A nighttime inspection is especially important because some lighting problems are invisible during the day.
Protective film on metal and acrylic surfaces can usually remain in place during handling and be removed after installation, following the material supplier’s instructions.
13. What Should the Manufacturer Provide?
Good channel letter installation starts at the factory.
Depending on the project, the supplier should provide:
- 1:1 installation template
- Mounting hardware
- Threaded studs
- Spacers
- Power supplies
- Wiring reference
- Production drawing
- Letter numbering
- Installation diagram
- Product photos
- Lighting test video
For large or multi-set projects, numbering letters and matching them to production drawings can save significant installation time.
Individual Mount vs Raceway: Quick Comparison
| Factor | Individual Mount | Raceway Mount |
|---|---|---|
| Appearance | Cleaner | Raceway visible |
| Wiring | More planning required | Easier |
| Wall penetrations | More | Fewer |
| Installation speed | Slower | Often faster |
| Halo-lit letters | Excellent | Depends on design |
| Uneven wall | More difficult | Often easier |
| Premium storefront | Excellent | Less architectural |
The best channel letter mounting method depends on the building and project requirements.
Common Channel Letter Installation Mistakes
Common mistakes include:
- Ordering before checking wall structure
- Not providing installation photos
- Forgetting to confirm cable exits
- Installing halo letters too close to the wall
- Using inconsistent spacers
- Hiding power supplies where they cannot be accessed
- Ignoring local permits
- Confirming electrical requirements too late
- Installing without a full-size template
- Failing to inspect the sign at night
Many of these problems can be avoided before the sign leaves the factory.
Channel Letter Installation Checklist
Before production:
- Confirm wall type
- Confirm sign dimensions
- Check local permit requirements
- Select individual or raceway mounting
- Confirm cable route
- Confirm power-supply location
- Confirm voltage and electrical requirements
- Send installation photos
Before installation:
- Check letters against the packing list
- Review the mounting template
- Confirm sign position
- Confirm structural mounting points
- Inspect electrical components
After installation:
- Check alignment
- Test illumination
- Inspect halo consistency
- Confirm color temperature
- Check visible cables
- Remove protective film
- Photograph the sign during day and night
Frequently Asked Questions
How are channel letters installed?
Most channel letters are either installed individually with concealed studs or mounted together on a raceway or supporting frame.
The correct method depends on the wall, sign size and wiring access.
Do channel letters need a raceway?
No.
Individual channel letter mounting is common when a cleaner architectural appearance is required.
Raceways are useful when wiring access is limited or the building should have fewer penetrations.
How far should backlit channel letters sit from the wall?
Approximately 15–40 mm is common for many projects, but there is no universal distance.
The correct spacing depends on LED output, wall color, surface texture and letter size.
Can channel letters be installed on ACP?
Yes, but the installer should confirm whether structural framing exists behind the panel.
The decorative ACP surface alone may not be enough to support larger signs.
Who should install illuminated channel letters?
Structural mounting should be handled by qualified installers, while electrical work should follow local regulations and be completed by appropriately qualified professionals.
Should a mounting template be included?
For custom letters, especially international projects, a full-size 1:1 template is highly recommended.
It helps reduce positioning errors and simplifies installation.
Final Thoughts
A successful channel letter installation begins before anyone drills the first mounting hole.
The manufacturer, buyer and local installer should confirm:
- Wall structure
- Mounting method
- Letter spacing
- Cable routing
- Power-supply location
- Halo spacing
- Electrical requirements
- Local permits
When ordering custom channel letters from HLW Sign, send us your logo, dimensions and a clear photo of the installation wall.
We can recommend a suitable sign structure and prepare production drawings, a 1:1 installation template, mounting accessories and installation references for your local installer.